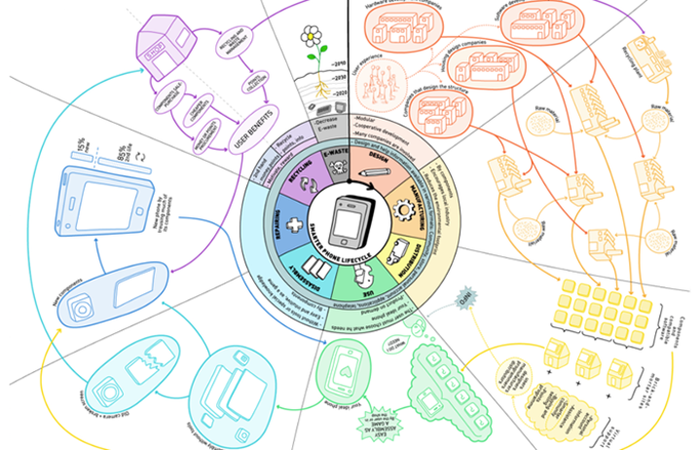
Principerna för hållbar design är integrerade i alla stadier i design- och byggprocessen och kan driva innovation, samtidigt som naturresurserna bevaras.
Denna kurs innehåller videoföreläsningar, designutmaningar, programvaruhandledning för Fusion 360 och en rad hållbara designdokument och exempel från ledande experter inom området. Under denna kurs kommer du att använda programvaran Fusion 360 CAD / CAM för att designa, utveckla, prototypa och testa hållbar innovation genom en serie 3-timmars utmaningsuppdrag.
Genom att använda detta strukturerade tillvägagångssätt kan du lära dig att stänga av dina förutfattade meningar och se saker på ett nytt sätt. Oavsett om du vill förbättra en befintlig lösning eller ta itu med en hållbar utmaning för första gången, förbereder denna kurs produktdesigners och ingenjörer att ta ett snabbt steg framåt för att integrera principerna för hållbarhet i deras designprocess.
The principles of sustainable design are integral to all stages of the design and build process and can drive innovation, while also preserving natural resources.
This course includes video lectures, design challenges, Fusion 360 software tutorials, and a range of sustainable design documents and examples from leading experts in the field. During this course, you’ll use Fusion 360 CAD/CAM software to design, develop, prototype, and test sustainable innovation through a series of 3-hour challenge assignments.
Working through this structured approach, you can learn how to suspend your judgment and look at things in a new way. Whether you are looking to improve an existing solution or address a sustainable challenge for the first time, this course prepares product designers and engineers to take a quick step forward to integrating the principles of sustainability into their design process.
Project resource download
Getting started In this lesson, we’ll discover what you’ll learn in this course and download the software and resources you need.
Instructor guidePrinciples of Sustainable Design – Instructor guide
Lesson 1: Introduction to sustainable design This lesson introduces you to case studies of good practice models.
Lesson 2: Extending product lifetimes This lesson introduces you to good practice models for improving product lifetimes.
Lesson 3: Green materials This lesson provides you with lectures, videos, case studies, and good practice models for green materials selection.
Lesson 4: Reducing energy loss This lesson introduces you to case studies and good practice models for energy-efficient design, including fluid dynamics, optimizing heat transfer, and reducing friction.
Lesson 5: Lightweighting This lesson introduces you to case studies and good practice models for lightweighting in design.
Lesson 6: Persuasive design This lesson introduces you to case studies and good practice models for persuasive design.
Lesson 7: Biomimicry This lesson introduces you to case studies and good practice models for biomimicry.
Appendix: Getting started with Fusion 360 This lesson introduces you to case studies and good practice models when using CAD/CAM in the design development process.
The Agile Manifesto is comprised of four foundational values and 12 supporting principles which lead the Agile approach to software development. Each Agile methodology applies the four values in different ways, but all of them rely on them to guide the development and delivery of high-quality, working software.
1. Individuals and Interactions Over Processes and Tools The first value in the Agile Manifesto is “Individuals and interactions over processes and tools.” Valuing people more highly than processes or tools is easy to understand because it is the people who respond to business needs and drive the development process. If the process or the tools drive development, the team is less responsive to change and less likely to meet customer needs. Communication is an example of the difference between valuing individuals versus process. In the case of individuals, communication is fluid and happens when a need arises. In the case of process, communication is scheduled and requires specific content.
2. Working Software Over Comprehensive Documentation Historically, enormous amounts of time were spent on documenting the product for development and ultimate delivery. Technical specifications, technical requirements, technical prospectus, interface design documents, test plans, documentation plans, and approvals required for each. The list was extensive and was a cause for the long delays in development. Agile does not eliminate documentation, but it streamlines it in a form that gives the developer what is needed to do the work without getting bogged down in minutiae. Agile documents requirements as user stories, which are sufficient for a software developer to begin the task of building a new function. The Agile Manifesto values documentation, but it values working software more.
3. Customer Collaboration Over Contract Negotiation Negotiation is the period when the customer and the product manager work out the details of a delivery, with points along the way where the details may be renegotiated. Collaboration is a different creature entirely. With development models such as Waterfall, customers negotiate the requirements for the product, often in great detail, prior to any work starting. This meant the customer was involved in the process of development before development began and after it was completed, but not during the process. The Agile Manifesto describes a customer who is engaged and collaborates throughout the development process, making. This makes it far easier for development to meet their needs of the customer. Agile methods may include the customer at intervals for periodic demos, but a project could just as easily have an end-user as a daily part of the team and attending all meetings, ensuring the product meets the business needs of the customer.
4. Responding to Change Over Following a Plan Traditional software development regarded change as an expense, so it was to be avoided. The intention was to develop detailed, elaborate plans, with a defined set of features and with everything, generally, having as high a priority as everything else, and with a large number of many dependencies on delivering in a certain order so that the team can work on the next piece of the puzzle.
With Agile, the shortness of an iteration means priorities can be shifted from iteration to iteration and new features can be added into the next iteration. Agile’s view is that changes always improve a project; changes provide additional value.
Perhaps nothing illustrates Agile’s positive approach to change better than the concept of Method Tailoring, defined in An Agile Information Systems Development Method in use as: “A process or capability in which human agents determine a system development approach for a specific project situation through responsive changes in, and dynamic interplays between contexts, intentions, and method fragments.” Agile methodologies allow the Agile team to modify the process and make it fit the team rather than the other way around.
The Twelve Agile Manifesto Principles
The Twelve Principles are the guiding principles for the methodologies that are included under the title “The Agile Movement.” They describe a culture in which change is welcome, and the customer is the focus of the work. They also demonstrate the movement’s intent as described by Alistair Cockburn, one of the signatories to the Agile Manifesto, which is to bring development into alignment with business needs.
The twelve principles of agile development include:
Customer satisfaction through early and continuous software delivery – Customers are happier when they receive working software at regular intervals, rather than waiting extended periods of time between releases.
Accommodate changing requirements throughout the development process – The ability to avoid delays when a requirement or feature request changes.
Frequent delivery of working software – Scrum accommodates this principle since the team operates in software sprints or iterations that ensure regular delivery of working software.
Collaboration between the business stakeholders and developers throughout the project – Better decisions are made when the business and technical team are aligned.
Support, trust, and motivate the people involved – Motivated teams are more likely to deliver their best work than unhappy teams.
Enable face-to-face interactions – Communication is more successful when development teams are co-located.
Working software is the primary measure of progress – Delivering functional software to the customer is the ultimate factor that measures progress.
Agile processes to support a consistent development pace –Teams establish a repeatable and maintainable speed at which they can deliver working software, and they repeat it with each release.
Attention to technical detail and design enhances agility – The right skills and good design ensures the team can maintain the pace, constantly improve the product, and sustain change.
Simplicity – Develop just enough to get the job done for right now.
Self-organizing teams encourage great architectures, requirements, and designs – Skilled and motivated team members who have decision-making power, take ownership, communicate regularly with other team members, and share ideas that deliver quality products.
Regular reflections on how to become more effective – Self-improvement, process improvement, advancing skills, and techniques help team members work more efficiently.
The intention of Agile is to align development with business needs, and the success of Agile is apparent. Agile projects are customer focused and encourage customer guidance and participation. As a result, Agile has grown to be an overarching view of software development throughout the software industry and an industry all by itself.
Kent Beck Mike Beedle Arie van Bennekum Alistair Cockburn Ward Cunningham Martin Fowler
James Grenning Jim Highsmith Andrew Hunt Ron Jeffries Jon Kern Brian Marick
Robert C. Martin Steve Mellor Ken Schwaber Jeff Sutherland Dave Thomas
En ny våg av innovation driver en radikal förändring av mode och textilbranschen. I framtiden kan kläder vara datorer, tillverkade med material designade och odlade i ett labb.
Filmen nedan ger en inblick i det som har kommit att kallas Fashiontech.
Kopiera nedanstående text, klistra in den i din loggbok och läs sedan texten.
Bärbar teknik, data, automatisering och labbodlat material kommer att ha en stor inverkan på vad människor kommer att ha på sig i framtiden.
Sedan sömnaden och vävningen föddes har tekniken alltid lett till utveckling inom mode. Den industriella revolutionen mekaniserade tillverkning som möjliggör massproduktion. På 1960-talet tog syntetiska material som polyester fart och skapade nya möjligheter för mode.
Nu öppnar konvergensen av ny teknik upp tidigare otänkbara möjligheter. Dr Amanda Parkes är modevetenskapsman och chef för innovation vid FT-labs, ett riskkapitalföretag som främst investerar i modetekniska startups. Hon berättar att det bland dessa nystartade företag handlar om att hitta nästa generation förnybara material som kan odlas i ett labb. Traditionell siden produceras av insektslarver som bildar kokonger, oftast silkesmaskar. Men snarare än att lita på dessa insekter, så skapar bulttrådar silke i provrör. Biotillverkade material tar bort behovet av djur och insekter och det är ett mer hållbart och effektivt sätt att producera råmaterial.
Andra företag skapar läderalternativ. I stället för att använda djur skapar forskare biotillverkade material från ananasblad och till och med svamp. Konvergensen mellan mode och teknik ger också möjligheter att förändra inte bara kläder utan de människor som bär dem.
Myant är ett företag som är banbrytande i skapandet av kläder som kan övervaka alla dina rörelser. Så kallade smarta tyger förutspås bli nästa stora genombrott för bärbar teknik. Garn kombineras med elektroniska sensorer så att viktiga data kan fångas från människokroppen. För att skapa kläder som kan övervaka bärarens hälsa och fitness har Myant samlat team av människor som inte traditionellt har arbetat under samma tak. Smarta tyger kan radikalt förändra konsumenternas relationer till kläderna de bär, men när tekniken ökar förändringstakten, hur kan branschen hålla reda på vad konsumenterna verkligen vill ha?
Francesca Muston är chef för detaljhandeln på WGSN, världens ledande modeprognosbyrå. Personalen här använder big data för att analysera politiska, sociala och miljömässiga trender för att förutsäga morgondagens heta mode. Teknik driver en explosion i konsumentens val såväl som det förvirrande utbudet av kläddesign och skapande. För att textil- och modebranschen ska överleva vänder de sig till tekniken. Maskininlärningsteknologier är nu centrala för modeprognoser, vilket snabbt upptäcker mönster bland den ständigt växande datamängden.
Från bioteknik till demografiska förändringar och att förutsäga trender är inte längre en konst, det har blivit en vetenskap.
I följande filmklipp (The Science of Great UI) kan du lära dig de viktigaste tumreglerna för god design när det kommer till UI användargränssnitt. Små ändringar kan få en stor effekt på resultatet av vad du skapar.
Går det att använda skärmen från en gammal överbliven bärbar dator till en Raspberry Pi? Svaret på den frågan är …nja. Om du kompletterar med ett speciellt kort, ett LVDS LCD-controller board, med en anpassad kabel mellan din Raspberry Pi och LCD-skärmen, så kan du få det att fungera. Du kan även koppla in LCD-skärmen till en massa andra prylar som datorer, videospelare, övervakningskameror m.m. Det är dock viktigt att veta en del saker om skärmen först innan du kan välja lämpligt LCD Controller kort. Är det 1- eller flerkanals LVDS? Vilken typ av kontakter används? Vilken upplösning har skärmen? Vilken typ av bakgrundsbelysning har skärmen? Mer info om LVDS hittar du längre ner på denna sida.
Följande filmklipp (ReUsing old laptop displays for Raspberry Pi and other uses) visar hur man gör:
ReUsing old laptop displays for Raspberry Pi and other uses
Mer information och exempel på olika LCD-controller boards och hur du väljer rätt hittar du i denna uppföljningsvideo (Old laptop Screens on a Raspberry PI… Part 2):
Old laptop Screens on a Raspberry PI… Part 2
De LCD Controller-kort som används i filmklippet ovan är:
Tillverkning, distribution och användningen av olika typer av produkter står för en stor andel av världens utsläpp, utnyttjande av ändliga naturtillgångar och bidrar till en negativ och destruktiv klimatpåverkan. Vad kan ett varumärke eller företag göra för att bli ett mer hållbart företag? Hur kan man som företag jobba med hållbar utveckling? På denna sida kommer ett antal konkreta exempel presenteras.
FN prisar Apples satsning på förnybar energi
Apple är ett företag som under många år stått för en betydande del av världens utsläpp. Många av företagets produkter har medvetet designats, konstruerats och tillverkats på ett sätt som försvårat möjligheten att reparera och laga dem. Efter massiv kritik från upprörda konsumenter världen över, och ett flertal kostsamma och långdragna juridiska tvister, har företaget på senare år styrt om till ett mer hållbart företagande ur ett miljö- och klimatperspektiv.
Det Apple lyckats åstadkomma inom ramen för sina miljösatsningar, och anledningen till att de nu alltså uppmärksammats av FN, är följande:
Minskat sina koldioxidutsläpp med 35% de senaste tre åren.
Bytt till 100% förnybar energi i sina kontor, butiker och serverhallar i 43 länder.
Minskat den genomsnittliga energianvändningen med 70% fördelat över företagets huvudsakliga produktsortiment.
Apple har också inlett samarbete med Conservation International för att skydda och återskapa ett 11000 hektar stort saltvattenrikt skogsområde i Colombia som beräknas kunna suga upp 1 miljon ton koldioxid (CO2) under projektets livstid.
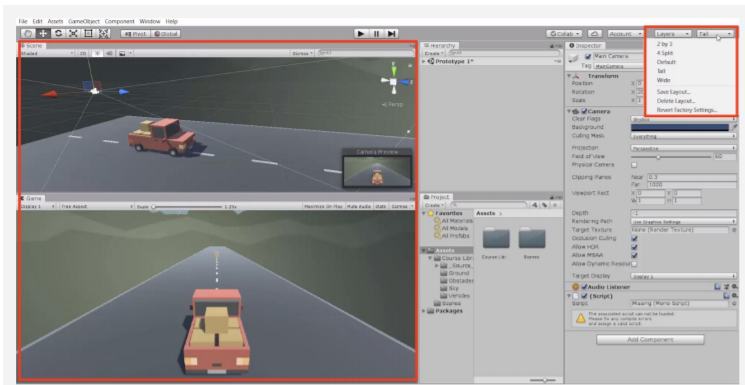
Här är instruktioner för att komma igång med spelprogrammering i Unity. Programmeringsspråket är C#, men utvecklingsmiljön i Unity erbjuder en hel del funktionalitet som möjliggör spelutveckling utan krav på djupa förkunskaper inom programmering.
I nedanstående artikel från Quartz kan vi läsa om hur forskare identifierat vad som händer i vår hjärna under djupandning.
Neuroscientists have identified how exactly a deep breath changes your mind
By Moran Cerf, November 19, 2017, Kellogg School of Management, Northwestern University
Breathing is traditionally thought of as an automatic process driven by the brainstem—the part of the brain controlling such life-sustaining functions as heartbeat and sleeping patterns. But new and unique research, involving recordings made directly from within the brains of humans undergoing neurosurgery, shows that breathing can also change your brain.
Simply put, changes in breathing—for example, breathing at different paces or paying careful attention to the breaths—were shown to engage different parts of the brain.
Humans’ ability to control and regulate their brain is unique: e.g., controlling emotions, deciding to stay awake despite being tired, or suppressing thoughts. These abilities are not trivial, nor do humans share them with many animals. Breathing is similar: animals do not alter their breathing speed volitionally; their breathing normally only changes in response to running, resting, etc. Questions that have baffled scientists in this context are: why are humans capable of volitionally regulating their breathing, and how do we gain access to parts of our brain that are not normally under our conscious control. Additionally, is there any benefit in our ability to access and control parts of our brain that are typically inaccessible? Given that many therapies—Cognitive Behavioral Therapy, trauma therapy, or various types of spiritual exercises—involve focusing and regulating breathing, does controlling inhaling and exhaling have any profound effect on behavior?
This recent study finally answers these questions by showing that volitionally controlling our respirational, even merely focusing on one’s breathing, yield additional access and synchrony between brain areas. This understanding may lead to greater control, focus, calmness, and emotional control.
The study, conducted by my post-doctoral researcher, Dr. Jose Herrero, in collaboration with Dr. Ashesh Mehta, a renowned neurosurgeon at NorthShore University Hospital in Long Island, began by observing brain activity when patients were breathing normally. Next, the patients were given a simple task to distract them: clicking a button when circles appeared on the computer screen. This allowed Dr. Herrero to observe what was happening when people breath naturally and do not focus on their breathing. After this, the patients were told to consciously increase the pace of breathing and to count their breaths. When breathing changed with the exercises, the brain changed as well. Essentially, the breathing manipulation activated different parts of the brain, with some overlap in the sites involved in automatic and intentional breathing.
The findings provide neural support for advice individuals have been given for millennia: during times of stress, or when heightened concentration is needed, focusing on one’s breathing or doing breathing exercises can indeed change the brain. This has potential application to individuals in a variety of professions that require extreme focus and agility. Athletes, for example, have long been known to utilize breathing to improve their performance. Now, this research puts science behind that practice.
Beyond studying the ability of humans to control and regulate their neural activity volitionally, the study was also unique in that it utilized a rare method of neural research: directly looking inside the brains of awake and alert humans. Typical neuroscience studies involving humans use imaging techniques (i.e. fMRI or EEG) to infer the neural activity in people’s brain from outside the skull. But studies involving electrodes implanted in humans’ brains are rare. The ability to look inside the humans’ brains allows us to study thinking, deciding and even imagining or dreaming by directly observing the brain. The study subjects in our work were patients who had electrodes implanted in their brain as part of a clinical treatment for epilepsy. These patients were experiencing seizures that could not be controlled by medication and therefore required surgical interventions to detect the seizure focus for future resection.
Given that detection requires the patient to have a spontaneous seizure in order to identify the exact seizure onset location, which can take days, the patients are kept in the hospital with electrodes continuously monitoring their brain activity.
The research findings show that the advice to “take a deep breath” may not just be a cliché. Exercises involving volitional breathing appear to alter the connectivity between parts of the brain and allow access to internal sites that normally are inaccessible to us. Further investigation will now gradually monitor what such access to parts of our psyche that are normally hidden can reveal.
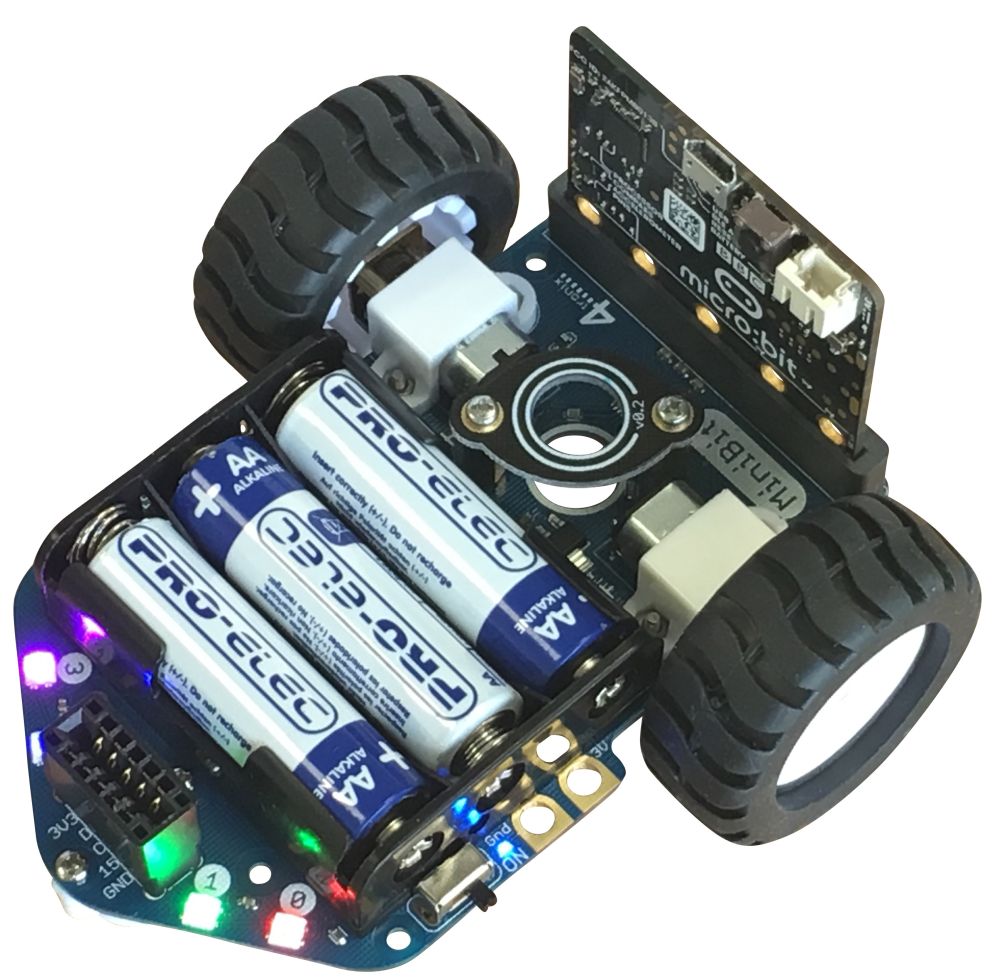
Connector for optional ultrasonic sensor or I2C breakouts (fully compatible with Pimoroni’s Breakout Garden range)
The Microbit pins 0, 1, 2, Gnd and 3V are available for use with croc clips etc.
Lots of mounting holes to create your own “body” for the robot or additional sensors etc.
Makecode extension and micropython examples available
* Wheels need pushing on and optional pen-holder needs screwing in if purchased
Assembly Instructions
Push on the wheels
If you have the pen holder, then use 2 screws to screw the two pillars into the main board from the bottom, then use the remaining 2 screws to screw the top holder into the pillars
Coding Your MiniBit
Microsoft MakeCode
Click any image to enlarge.
To load the extension, select Advanced, then Extensions. Then enter “Minibit” into the search box and press Enter. If that doesn’t find it (there are sometimes earch glitches) you can enter the full URL into the search box: “https://github.com/4tronix/MiniBit”
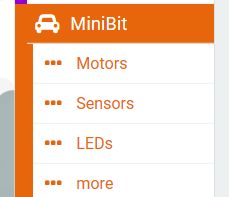
Once loaded, you will have a MiniBit menu item with 4 sub-folders:
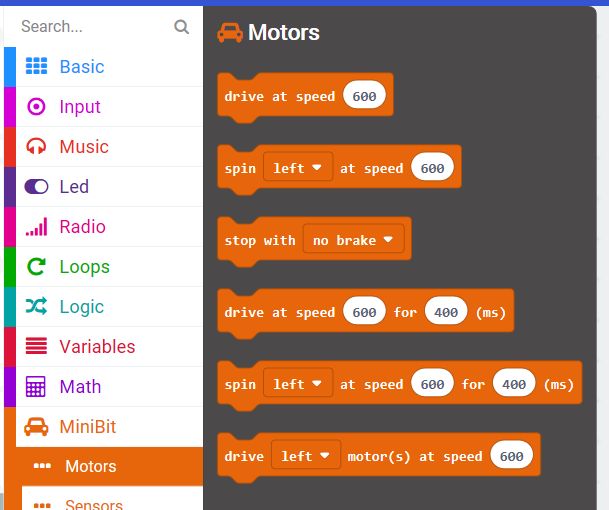
Motor Blocks
The first command “Drive at speed 600” will set both motors to speed 600. If you do nothing more, the MinBit will continue going forward forever.
The speed value can be from -1023 (full speed reverse) to 1023 (full speed forward). Setting the speed to 0 will stop the motors
There is also a block for spinning – left motor and right motor turn at the same speed but in opposite directions.
Both the drive and spin blocks have a paired block that will drive (or spin) for a selected amopunt of time and then stop
There are two ways of stopping. Coasting to a stop or braking. If you set the speed to 0 or use the “stop with no brake” command, then it will stop gently over the coourse of a second or so 9depending on initial speed). If you use the “stop with brake” block (or the drive/spin for a time block) then it will stop almost immediately.
Finally, you can drive each motor individually. For instance if you set the left motor to drive at 600 and the right motor to drive at 1000, then it will perform an arc towards the left
LED Blocks
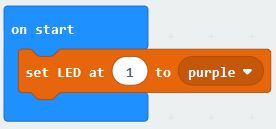
You can use these blocks to set and clear one or all the LEDs.
Note that the MiniBit defaults to automatically updating the LEDs whenever any change is made see the “more…” section to learn how and why to change this behaviour
The LEDs on the MiniBit are labelled from 0 to 3. Use these numbers in the Makecode blocks to change the colour. eg setting LED 1 to Purple could be done like this:
The default brightness level is 40. This is plenty bright enough for most uses, saves damaging eyes, and reduces battery consumption. If required you can change the brightness from 0 up to 255
Sensor Blocks
Only one sensor in here; the ultrasonic distance sensor. You can get the values to the nearest object in cm, inches or microseconds
More Blocks
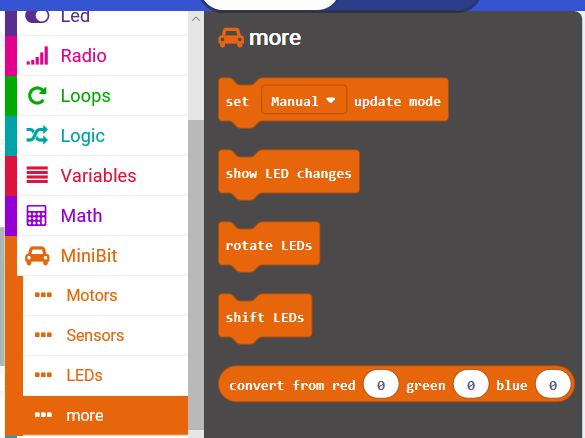
These are the advanced usage blocks. Most students will not need to use them.
Set update mode is used to switch between automatic LED updates or manual LED updates. The default is for automatic updates: every change to the LEDs results in all the LEDs being written to with the updated values. This is easy to understand, but it does mean that when making a lot of changes it can slow things down considerably. If doing that, it is best to use Manual update mode, make all the changes required, then use the show LED changes block to make all the updates in one go.
Rotate LEDs block will move the colour in LED 0 to LED 1, LED1 to LED2, LED2 to LED3 and LED3 to LED0. If done repeatedly, with a delay between each one, it will show the lED colours rotating around all the 4 LEDs.
Shift LEDs block will move LED0 to LED1, LED1 to LED2 and LED2 to LED3. It will blank LED0. So all the colours will disappear one at a time from 0 to 3
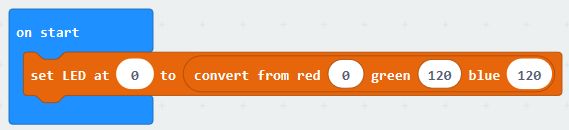
You can also create your own colours and replace the fixed list of colours in any command using the convert from red, green, blue block. For example, to set LED0 to a blue-green colour:
Programming in microPython
Driving Motors
The motors use 2 pins each to determine the speed and direction. In microPython we use write_analog ( ) to set the first pin to a value between 0 and 1023 and the second pin to 0 in order to go forward. To reverse, we swap the pins so that the first pin is set to 0 and the second pin is set to the value.
On the MiniBit the left motor uses pins 12 and 8, and the right motor uses pins 16 and 14.
So to move the left motor forwards at speed 600:
pin12.write_analog(600) pin8.write_digital(0)
And to move the right motor in reverse at speed 450:
pin16.write_digital(0) pin14.write_analog(450)
To stop with no brake, use write_digital ( ) to set both pins to 0. To stop with brake, set both pins to 1. eg. stop left motor with coasting and right motor with brake:
pin12.write_digital(0) pin8.write_digital(0)
pin16.write_digital(1) pin14.write_digital(1)
So a complete, but fairly useless, program to drive the motors for 2 seconds and then stop quickly, would look like this:
from microbit import * pin12.write_analog(600) pin8.write_digital(0) pin16.write_analog(600) pin14.write_digital(0) sleep(2000) pin12.write_analog(0) # temporary fix for python bug pin12.write_digital(1) pin8.write_digital(1) pin16.write_analog(0) # temporary fix for python bug pin16.write_digital(1) pin14.write_digital(1)
Note the 2 lines that write_analog(0) before swapping a pin from analog to digital. These are required until a fix is obtained for the python PWM driver continually updating the pin type to analog
Lighting the LEDs
This uses the standard neopixel code, with the LEDs connected to Pin 13.
At the top of your program add import neopixel then:
leds = neopixel.NeoPixel(13, 4)
leds is then an array of all 4 LEDs. leds[0] refers to the LED 0 and leds[3] refers to LED3. Each element of the array is a set of 3 numbers representing the Red, Green and Blue values (each 0..255) for that LED. So to set LED2 to Blue:
leds[2] = (0, 0, 255)
All this does is update the array. To show the new value of the array, we need to call the show ( ) function as follows:
leds.show ( )
Reading the Ultrasonic Distance Sensor
The ultrasonic sensor breakout is on pin15.
The concept is simple: send an ultrasonic pulse out, then time how long it takes to return. Using the speed of sound and some maths, we can then work out the distance. The following complete program has 2 parts to it: a function sonar ( ) which returns the distance to the object, and the main code in a loop which continually prints the distance. We also need to import the utime library:
from microbit import * from utime import ticks_us, sleep_us
def sonar(): pin15.write_digital(1) # Send 10us Ping pulse sleep_us(10) pin15.write_digital(0) pin15.set_pull(pin15, NO_PULL) while pin15.read_digital() == 0: # ensure Ping pulse has cleared pass start = ticks_us() # define starting time while pin15.read_digital() == 1: # wait for Echo pulse to return pass end = ticks_us() # define ending time echo = end-start distance = int(0.01715 * echo) # Calculate cm distance return distance